
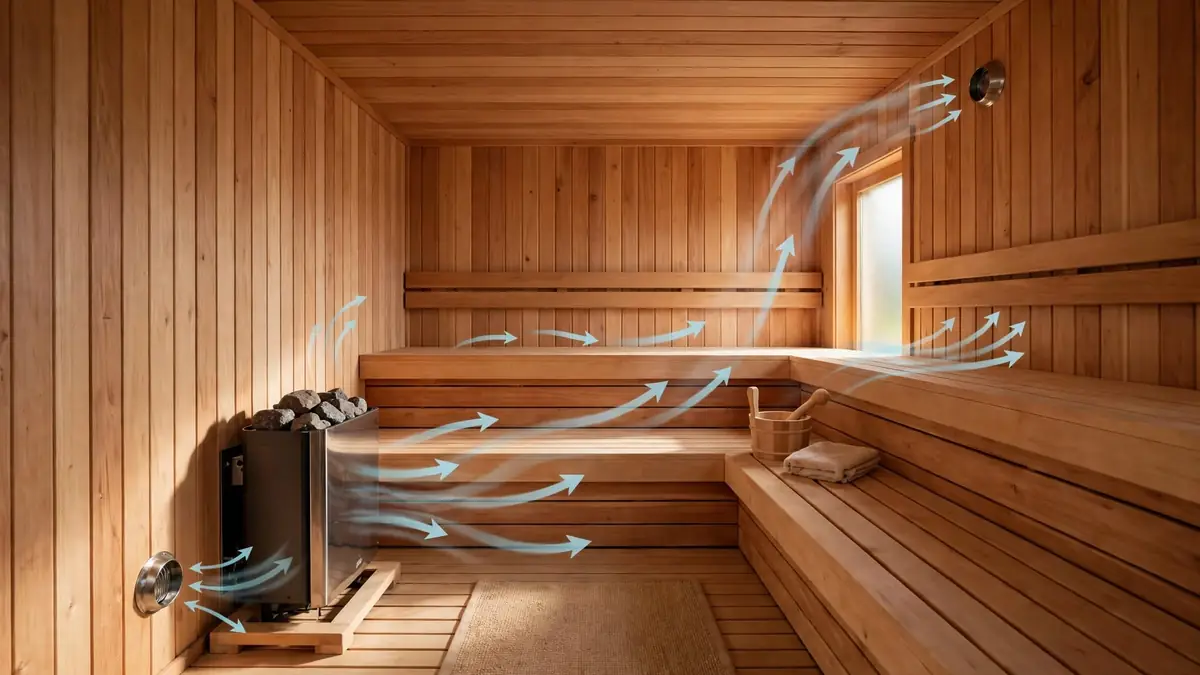
Sauna Ventilation Requirements: Intake, Exhaust & Airflow Planning

Sauna ventilation requirements are easy to misunderstand because there is no single intake-and-exhaust layout that works for every sauna.
An electric sauna with mechanical exhaust may need its fresh-air supply in a very different position from a gravity-ventilated sauna. A wood-burning stove adds combustion-air considerations. A manufactured infrared cabin may already have ventilation designed into the enclosure.
The safer planning sequence is straightforward: choose the heater, identify the ventilation method, locate the temperature sensor, then place the intake and exhaust according to the exact manufacturer instructions.
That approach prevents a common sauna-building mistake: copying a vent diagram that belongs to a different heater or airflow system.
Quick Answer: Does a Sauna Need Ventilation?
A sauna needs a planned path for fresh air to enter, move through the occupied space, and leave the room. The correct vent positions and required airflow depend on the heater, sauna type, ventilation method, sensor location, and manufacturer instructions.
Several major manufacturers use roughly six air changes per hour in their sauna guidance. Harvia’s current ventilation guidance specifies six air changes per hour for an electric sauna, and HUUM’s DROP manual likewise calls for six air changes per hour. Treat that as manufacturer guidance, not a universal sizing rule for every sauna.
The bigger mistake is assuming that an air-change target tells you where to cut the vents. It does not.
Start With the Ventilation System, Not a Generic Diagram
A vent location that works with natural airflow can be wrong for a fan-assisted system.
Harvia demonstrates the difference clearly. For an electric heater with mechanical ventilation, its guidance places the supply air in the upper part of the sauna. With gravity ventilation, the supply is installed below or next to the heater.
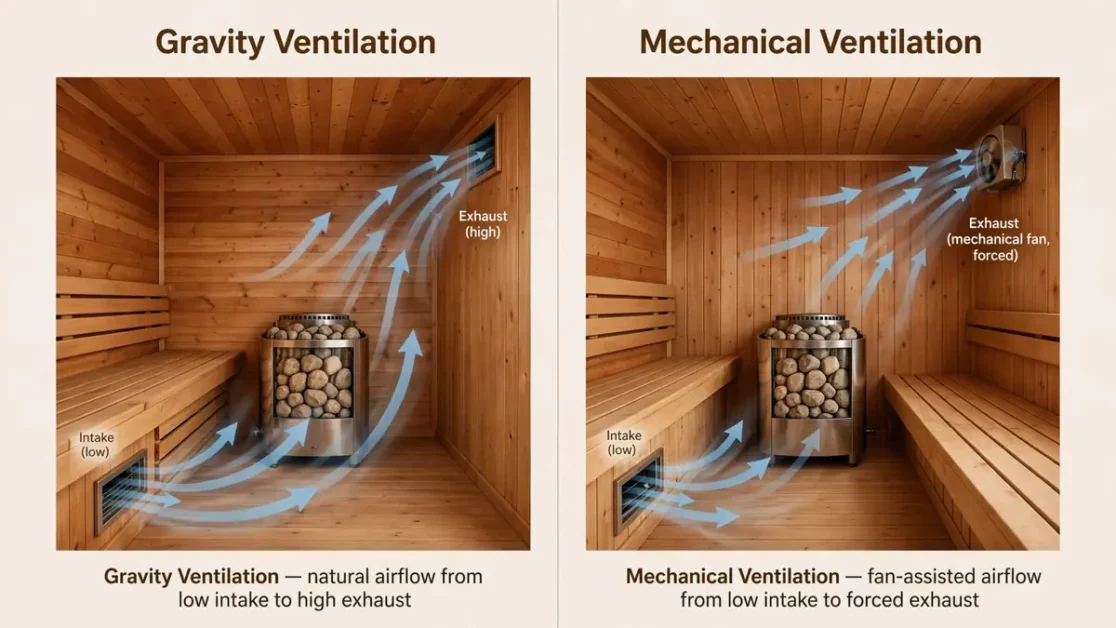
That difference explains why online advice about the “correct sauna intake height” often contradicts itself.
Gravity Ventilation
Gravity or natural ventilation relies on pressure and temperature differences rather than a powered exhaust fan.
Fresh air enters through a designed opening, warms as it interacts with the heater and room air, moves through the sauna, and exits through the outlet path.
Harvia’s gravity-ventilation example for an electric heater places the supply below or next to the heater and the exhaust near the floor, as far from the heater as practical. Finnleo’s sauna construction guidance also places its natural-draw inlet directly under the heater but uses its own outlet arrangement.
The lesson is not that one manufacturer is right and another is wrong. Their equipment and intended room designs differ.
Mechanical Ventilation
Mechanical ventilation uses a fan or building exhaust system to create airflow.
Harvia places the supply in the upper part of the sauna for its mechanically ventilated electric-heater arrangement. HUUM’s heater documentation likewise separates mechanical and gravity layouts, which is another reason to plan the system as a whole rather than choosing each vent independently.
Why You Should Not Mix the Two Layouts
A common planning error is taking the intake location from a gravity diagram, the exhaust location from a mechanical diagram, and adding a fan later.
That can produce a system no manufacturer actually specified. Treat the ventilation design as one complete system.
| Setup | Verify first | Avoid assuming |
|---|---|---|
| Electric + gravity | Heater/manual ventilation diagram | Intake always belongs high |
| Electric + mechanical | Supply, exhaust and sensor relationship | Intake always belongs near the floor |
| Wood-burning | Combustion air plus room ventilation | Electric-heater diagrams apply |
| Prefab/infrared cabin | Cabin manufacturer’s built-in ventilation | Traditional sauna vent rules apply unchanged |
Sauna Ventilation Requirements by Heater Type
The heater is the best starting point because its design affects the airflow arrangement around it.
Electric Sauna Heaters
Electric heaters do not need combustion air, but they still depend on properly planned room airflow.
The intake should bring fresh air into a location where it can mix effectively without disrupting the temperature-control system. Exhaust should move used air out without creating an unintended shortcut directly from inlet to outlet.
Manufacturer instructions matter more than a generic measurement chart. If the electrical side of the project is not settled yet, review the sauna electrical requirements guide before walls and service routes are finalized.
Wood-Burning Sauna Stoves
A wood-burning sauna has an extra requirement: the fire itself needs air. Room comfort ventilation and the stove’s combustion needs should not be treated as unrelated systems.
Harvia publishes separate gravity and mechanical layouts for wood-burning heaters. For example, its gravity arrangement places fresh air near the floor by the stove and the outlet high and far away, while its mechanical arrangement places the fresh-air inlet above the stove and the outlet low.
For stove, chimney, and heater-clearance planning, see the wood-burning barrel sauna guide.
Infrared and Prefab Sauna Cabins
A manufactured sauna cabin is different from a custom room built from studs, insulation, moisture-control materials, and wood paneling.
Do not assume a prefab infrared cabin needs new holes cut into it because a traditional sauna diagram shows two vents. First check the cabin installation manual, existing floor or wall openings, adjustable factory vents, required clearance around the enclosure, and instructions for keeping openings unobstructed.
Finnleo’s current room manuals specifically warn owners not to block ventilation openings. The infrared sauna guide covers the broader differences between infrared systems and traditional heated rooms.
Where Should the Sauna Intake Vent Go?
There is no universal intake height. Its correct location depends primarily on the heater design and whether air leaves through gravity or mechanical exhaust.
Harvia provides a useful example: its electric-sauna guidance places supply air in the upper part of a mechanically ventilated sauna, while gravity ventilation uses an intake below or next to the heater. Finnleo’s natural-draw construction guidance instead describes an inlet directly under the heater so its heater design can pull incoming room air into circulation.
Before cutting an intake opening, write down four things:
- Exact heater model.
- Natural or mechanical ventilation.
- Temperature-sensor position.
- Intake location shown in that heater’s current manual.
If those four items are not known, the wall is not ready to be cut.
Ventilation and the Temperature Sensor
The temperature sensor and fresh-air intake need to be planned together.
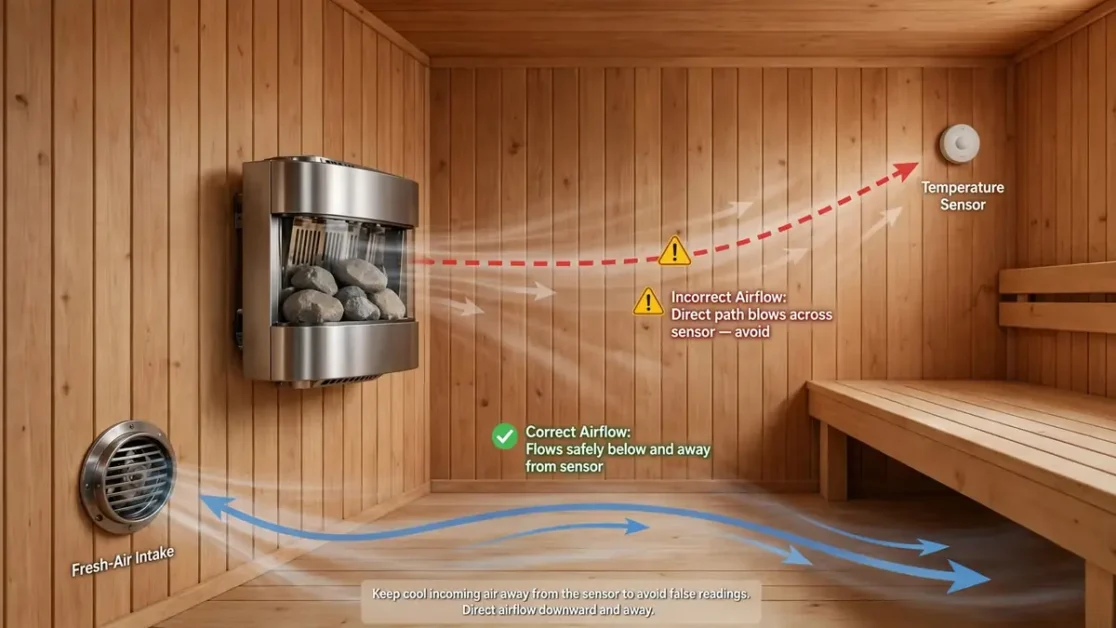
Cooler incoming air can move directly across a sensor if the two are poorly positioned. Harvia explicitly warns that supply airflow should not cool a separate temperature sensor and says the sensor must remain in the position specified by the heater manual.
A sensor affected by an air stream may not represent the room temperature the way the control system expects. Do not solve that problem by casually relocating the sensor. Adjust the ventilation plan around the required sensor location.
A useful sequence is heater position → sensor position → ventilation layout. That is much easier than discovering the conflict after the wood paneling has been installed.
Where Should the Sauna Exhaust Vent Go?
The common answer “opposite the heater” is only part of the story.
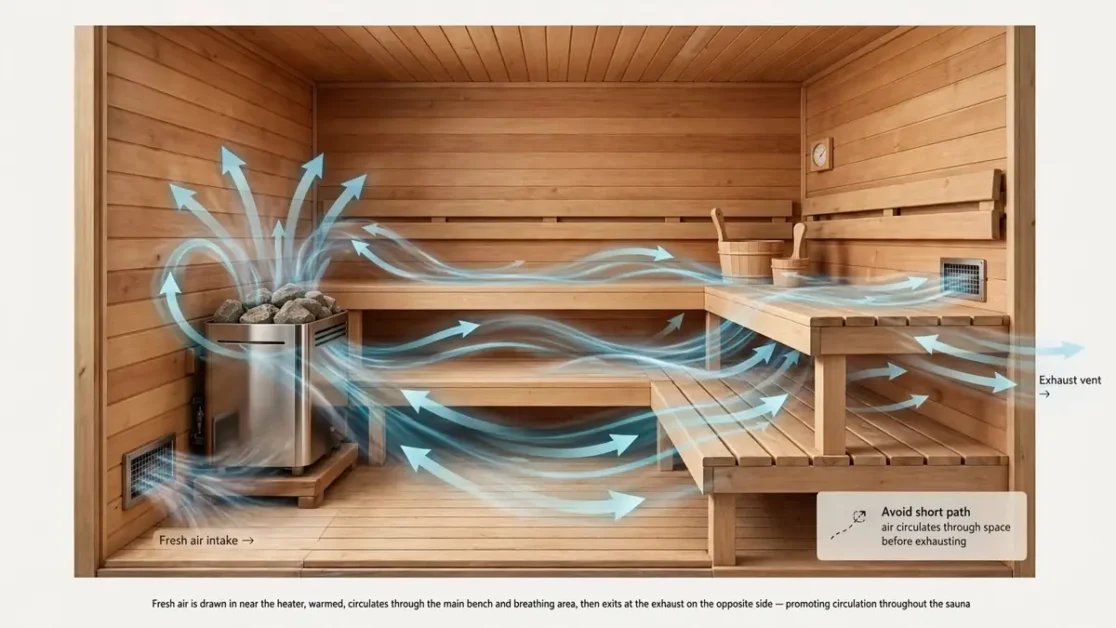
The exhaust needs to be far enough from the supply that air moves through the occupied space instead of entering and immediately leaving through a nearby opening.
Its height depends on the system. Harvia’s gravity example for an electric heater places the exhaust near the floor and as far from the heater as practical. Finnleo also locates its outlet away from the heater but specifies its own relationship between the intake and outlet.
Those differences make a generic “high exhaust” or “low exhaust” rule unreliable.
The exhaust destination matters too. Hot, moisture-laden air should not simply disappear into an unintended wall, ceiling, or concealed building cavity. Indoor installations may need coordination with the building’s ventilation system or an adjoining room designed to handle the airflow.
Does a Sauna Need a Separate Drying Vent?
Bathing ventilation and post-session drying are related, but they are not always the same job.
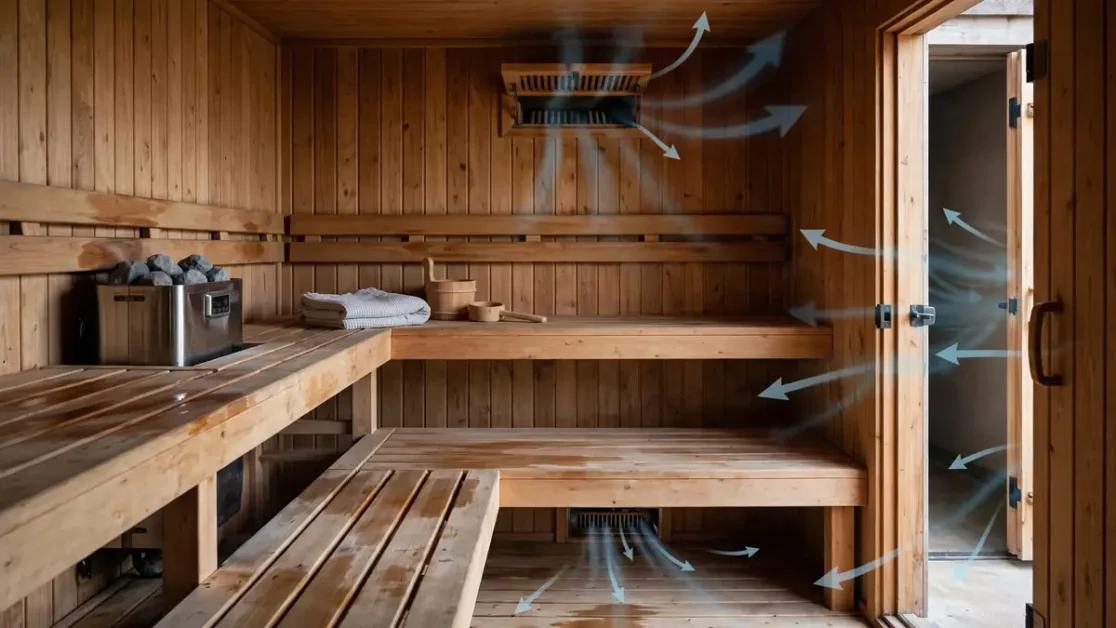
Some sauna systems include a separate high drying vent that stays closed while the sauna is heating and being used, then opens afterward. Harvia labels an optional drying vent in its current guidance and also notes that the sauna can be dried by leaving the door open after bathing.
The practical question is not “Does every sauna need a third vent?” It is: What is the designed method for getting residual moisture out of this sauna after use?
That answer should be clear before construction is finished.
How Much Airflow Does a Sauna Need?
Several major heater manufacturers use roughly six complete air changes per hour in their guidance. Harvia specifies that target for an electric sauna, and HUUM’s DROP manual uses the same six-air-changes-per-hour target. Use the exact heater or sauna manual before sizing vents or fans.
That does not justify applying one generic fan size or vent dimension to every sauna. Actual airflow planning can depend on room volume, heater design, manufacturer requirements, natural versus mechanical ventilation, duct resistance, the number and type of openings, the surrounding building ventilation, and local requirements.
Use this process instead:
- Calculate the sauna dimensions and room volume.
- Select the exact heater.
- Find the current installation manual.
- Identify its ventilation arrangement and airflow target.
- Determine whether the system is natural or mechanical.
- Size openings, ducts, and fans using that equipment guidance.
- Have mechanical or building-system modifications checked by an appropriate professional where needed.
Door Gaps, Adjacent Rooms, and Exhaust Paths
A gap beneath the sauna door can be part of a ventilation system, but it is not automatically the whole system.
Can the Gap Under the Door Count as Ventilation?
Sometimes it forms part of the airflow path. Do not assume an accidental construction gap provides the intake and exhaust performance required by the heater manufacturer.
Can the Sauna Exhaust Into an Adjoining Bathroom?
Some manufacturer layouts allow an adjoining washroom to form part of a designed mechanical exhaust path. Harvia, for example, specifies a door gap and mandatory mechanical exhaust for one such arrangement. That does not mean any bathroom can automatically serve as a sauna exhaust destination.
Can the Exhaust Terminate Inside an Attic or Wall Cavity?
A concealed cavity is not a substitute for a designed exhaust route. Plan where the air actually ends up, particularly in an indoor sauna where moisture can affect surrounding building materials.
Does an Indoor Sauna Always Need a Powered Fan?
Not automatically. The answer depends on the heater, sauna system, room location, and manufacturer guidance.
Plan Sauna Ventilation Before Closing the Walls
Ventilation should be coordinated while heater, electrical, sensor, bench, and wall details can still be changed.
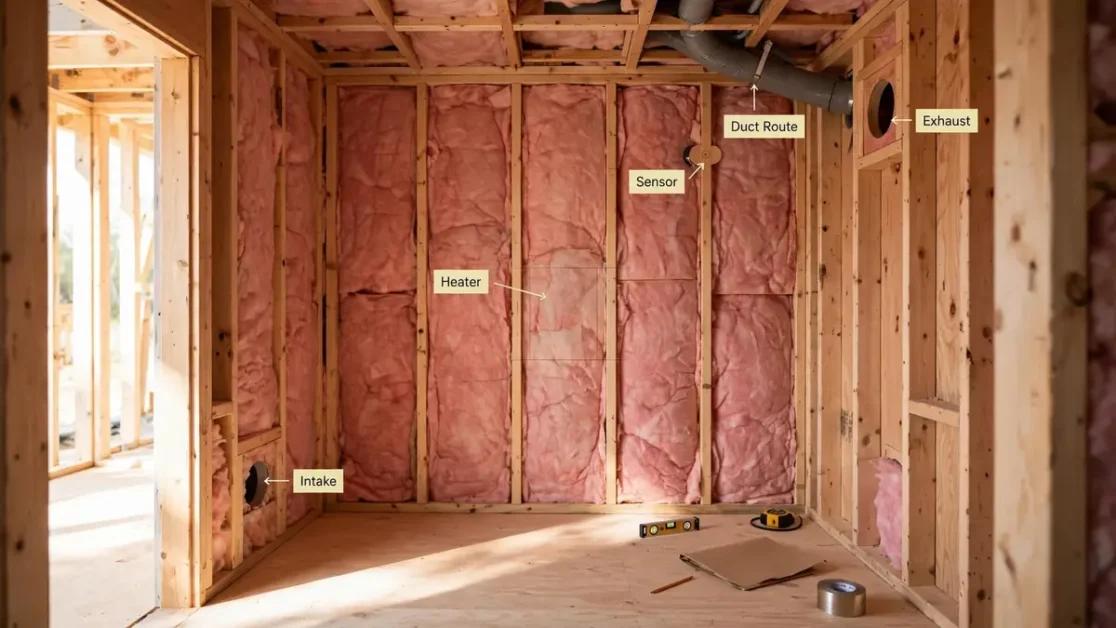
A practical rough-in sequence is:
- Choose the sauna type.
- Select the exact heater.
- Download the current installation manual.
- Determine gravity or mechanical ventilation.
- Mark the heater position.
- Mark the required sensor position.
- Mark the manufacturer-approved supply location.
- Mark the exhaust location.
- Decide where exhaust air will terminate.
- Plan any ducts, transfer paths, or fan equipment.
- Confirm building and HVAC requirements where applicable.
- Only then finish insulation, moisture-control layers, and interior paneling.
This order reduces the chance of reopening a finished wall because a vent, cable, duct, or sensor conflicts with another component. For the rest of the project sequence, use the sauna installation guide.
Common Sauna Ventilation Mistakes
- Copying one diagram from the internet. A layout may be correct for a particular heater and inappropriate for yours.
- Choosing vents before choosing the heater. The heater and its manual should drive the ventilation arrangement.
- Ignoring the temperature sensor. Supply air directed across the sensor can interfere with the control system’s intended measurement.
- Blocking factory openings. Prefab sauna vents and clearances are part of the product’s intended installation.
- Treating the door gap as the entire ventilation plan. A transfer opening has to lead somewhere useful.
- Forgetting how the sauna will dry. The room still needs a post-session drying strategy.
- Mixing gravity and mechanical diagrams. An intake designed for one airflow method should not automatically be combined with the exhaust from another.
- Waiting until the paneling is finished. The cheapest time to change a ventilation route is while the wall is still open.
Signs Your Sauna Airflow Plan Needs Rechecking
Ventilation is only one possible cause of sauna-performance problems, but these conditions justify reviewing the airflow design:
- Lower areas remain noticeably cooler than expected while heat concentrates overhead.
- The room feels persistently stuffy despite normal operation.
- The heater or control cycles in a way that does not match the room conditions.
- A temperature sensor sits close to an intake or strong air stream.
- Moisture lingers for a long time after use.
- A supply or exhaust opening has been blocked by stored items, trim, benches, or later renovations.
- An exhaust fan was added or changed after the original sauna installation.
- The heater was replaced with a different model without reviewing ventilation requirements.
Do not treat these signs as proof that ventilation is the only problem. Heater sizing, insulation, sensor installation, electrical supply, and room construction can produce similar symptoms. The sauna heater guide can help when heater selection or sizing is still uncertain.
Sauna Ventilation Planning Checklist
Use this worksheet before framing or paneling is closed.
| Planning item | Your sauna |
|---|---|
| Sauna type | __________ |
| Heater manufacturer | __________ |
| Heater model | __________ |
| Current installation manual obtained | Yes / No |
| Electric or wood-burning | __________ |
| Gravity or mechanical ventilation | __________ |
| Heater position marked | Yes / No |
| Temperature sensor position marked | Yes / No |
| Manufacturer-approved intake location | __________ |
| Manufacturer-approved exhaust location | __________ |
| Required vent size/airflow verified | __________ |
| Exhaust destination identified | __________ |
| Exhaust fan required | Yes / No / Verify |
| Door transfer-air requirement | __________ |
| Post-session drying method | __________ |
| Duct route planned before paneling | Yes / No |
| Building/HVAC requirements checked | Yes / No / N/A |
| Final layout checked against heater manual | Yes / No |
Do not mark the final line “Yes” because the arrangement resembles another sauna. Verify it against the instructions for the equipment actually being installed.
FAQs
Does Every Sauna Need an Intake and Exhaust Vent?
A sauna needs a planned ventilation path, but the physical arrangement varies. A custom traditional sauna, prefab cabin, mechanically ventilated room, and wood-burning sauna may use different openings and airflow strategies.
Where Should a Sauna Intake Vent Be Placed?
It depends on the heater and ventilation method. Harvia, for example, places supply air in the upper part of a mechanically ventilated electric sauna but below or beside the heater for gravity ventilation.
Should the Sauna Exhaust Vent Be High or Low?
There is no universal height. Manufacturer diagrams use different locations depending on heater type and ventilation method, so use the exact heater instructions.
Does an Infrared Sauna Need Ventilation?
A manufactured infrared cabin still needs the airflow intended by its designer, but that system may already be built into the cabin. Do not add, close, or alter openings without checking the manufacturer’s instructions.
Can a Sauna Exhaust Into the Bathroom?
Some systems use an adjoining washroom as part of a designed mechanical exhaust path. The sauna instructions and building ventilation system need to support that arrangement.
Is the Gap Under a Sauna Door Enough Ventilation?
Not by itself unless the manufacturer-designed system specifically uses that opening as part of the complete airflow path.
Does a Wood-Burning Sauna Need Different Ventilation?
Often, yes. A wood-burning stove needs combustion air as well as room ventilation, and mechanical exhaust requires careful pressure planning.
Can Poor Ventilation Affect Sauna Heater Performance?
It can. Harvia includes correct ventilation among the checks when a sauna heats slowly, and poor airflow or an intake that affects the temperature sensor can interfere with expected operation.
Verify the Heater Manual Before Cutting a Vent
Good sauna ventilation starts before the first hole is cut.
Choose the heater, determine whether airflow will be gravity-driven or mechanical, locate the temperature sensor, identify the exhaust destination, and verify the complete arrangement against the current manufacturer instructions.
The most useful rule is not “intake low” or “exhaust high.” It is do not cut the intake or exhaust until you know exactly which ventilation system your sauna and heater are designed to use.