Embark on the rewarding journey of building your DIY hot tub with our comprehensive guide. From planning and construction to maintenance, discover cost-saving tips, design ideas, and safety considerations to create your perfect backyard oasis.
I. Introduction
A. What is a DIY Hot Tub?
A DIY hot tub is a custom-built spa or hot tub created by individuals rather than purchased pre-made from a manufacturer. It involves selecting materials, designing the structure, and installing plumbing and heating systems alone or with minimal professional assistance.
[wps_youtube url=”https://youtu.be/iTTz6tEQG_4″ responsive=”yes” autoplay=”yes”]
B. Benefits of Building Your Own
Building your own hot tub comes with numerous benefits, including significant cost savings, the ability to customize features to your liking, and the satisfaction of completing a hands-on project.
Customization options are limitless, ranging from size and shape to unique features like jets, lighting, and eco-friendly heating systems.
C. Overview of the Project
This guide will cover the essential steps to plan, build, and maintain a DIY hot tub. We’ll explore everything from choosing the perfect location, designing your tub, selecting materials, and navigating the plumbing and heating setup to ensuring safety and efficiency throughout the project.
[wps_youtube url=”https://youtu.be/pNSqf-9M2HA” responsive=”yes” autoplay=”yes”]
II. Planning Your DIY Hot Tub
A. Choosing a Location
- Indoor:
- Pros: Year-round use, protection from the elements.
- Cons: Requires excellent ventilation and humidity control to prevent moisture damage. May need space modification.
- Considerations: Drainage, strong floor to support weight, proximity to water source for filling, professional help may be necessary.
- Outdoor:
- Pros: Fresh air, scenic views, easier setup in some cases.
- Cons: Seasonal use in colder climates, exposure to weather.
- Considerations: Foundation, accessibility, proximity to electrical, drainage options.
B. Sizing and Capacity
- Comfort: Think about how many people you want to accommodate at once, and allow for comfortable seating space.
- Space Constraints: Measure carefully and choose a hot tub size that fits the available area. Leave some room around the perimeter for maintenance.
- Typical Sizes: Hot tubs range from small 2-person models to larger tubs for 6 or more people.
C. Necessary Tools and Materials
This list will largely depend on your specific design, but here’s a general breakdown:
- Construction Tools:
- Measuring Tape, Level, Saw (circular/table saw depending on design), Drill, Screwdrivers, Hammer, Wrenches, Safety Gear.
- Materials:
- Lumber (treated), Concrete (if creating a slab), Decking Screws, Insulation, Waterproof Liner, Exterior Sealant (if wood), Structural Fasteners.
- Plumbing:
- PVC Pipe, Fittings, PVC Cement, Pump, Filter, Heater, Jets, Manifolds (optional), Electrical Supplies (wire, conduit, breakers – to be handled by a qualified electrician).
D. Budgeting for the Project
- Detailed Material List: Create a detailed materials list based on your design and price out everything individually.
- Equipment Costs: Pumps, filters, and heaters can vary significantly in price. Research your options to find a balance of quality and budget.
- Labor: Factor in the estimated cost of professional help if you’ll need an electrician or assistance with certain construction aspects.
- Contingency: Add 10-15% to your budget for unexpected costs – there are almost always some!

III. Building The Hot Tub Structure
A. Design Options
- Wood (Cedar or Redwood):
- Classic hot tub look, excellent insulation.
- Requires regular maintenance.
- Best choice if you want that traditional hot tub aesthetic.
- Concrete Block with a Liner:
- Very durable, easily customizable for unique shapes.
- Requires interior lining and possibly insulation.
- Good if you need a sturdier structure or want a unique design.
- Stock Tank:
- Cost-effective and simple solution.
- Limited in size and customization.
- Great for a rustic look and a quick setup.
B. Step-by-Step Instructions (Example: Wood Construction)
1. Foundation
- Level Area: Choose a flat area and clear it of debris.
- Concrete Slab (Recommended): Pour a concrete pad slightly larger than your hot tub dimensions for a stable base. Let it cure completely.
- Packed Gravel (Alternative): Lay down a thick layer of compacted gravel for a more budget-friendly option.
2. Framing The Base
- Treated Lumber: Use pressure-treated wood resistant to moisture.
- Framing Dimensions: Build a square or rectangular frame the size of your hot tub base.
- Joists: Add joists at regular intervals (e.g., every 16 inches) for support.
- Secure: Fasten the base securely to the foundation with appropriate fasteners.
3. Building the Walls
- Cedar or Redwood Boards: Choose weather-resistant wood boards with minimal knots.
- Dimensions: Cut boards to the desired height of your hot tub walls.
- Grooves (Optional): If desired, cut tongue-and-groove edges for tighter fitting.
- Attach to Base: Secure boards vertically to the base frame with deck screws.
4. Bench Seating (Optional)
- Design: Plan out the layout of your benches for comfort.
- Framing: Build simple support frames with treated lumber.
- Board Covering: Cover the bench framing with the same wood as the walls.
5. Insulation (Highly Recommended)
- Rigid Foam: Use rigid foam insulation boards cut to fit between wall studs.
- Sealing: Seal all gaps meticulously with expanding foam.
C. Sealing and Waterproofing
- Interior Liner: Choose a durable hot tub liner designed for your tub size. Install carefully according to the manufacturer’s instructions.
- Exterior (Wooden Tubs): Apply several coats of quality marine-grade sealant to the exterior of the wooden structure.
- Maintenance: Regularly inspect and repair any cracks in the liner or sealant.
IV. Plumbing and Heating System
A. Overview of Plumbing Components
- Pump: The heart of your hot tub’s circulation. It pulls water from the tub, pushes it through the filter and heater, and back into the tub through the jets.
- Filter: Removes debris and contaminants from the water. Cartridge filters are common for hot tubs.
- Heater: Warms the water to your desired temperature. Electric heaters are most common, though gas or propane heaters are options.
- Jets: Create the massaging action of the hot tub. Different types of jets offer varying water pressure and massage patterns.
- Plumbing Lines: PVC pipes connecting all the components, ensuring water flows smoothly throughout the system.
B. Installing Pumps, Filters, and Heaters
- Placement: Ensure components are accessible for maintenance. Consider a dedicated equipment pad near the tub, with proper drainage for potential leaks.
- Manufacturers’ Instructions: Crucially, follow instructions provided with your specific pump, filter, and heater for proper installation and connections.
- Plumbing Connections: Connect components using PVC pipe, fittings, and PVC cement. Ensure secure, leak-proof connections.
- Manifolds: Jets are often grouped on manifolds, simplifying the pipework.
C. Understanding Electrical Needs
- Significant Power: Hot tubs require dedicated circuits, often with GFCI (Ground Fault Circuit Interrupter) protection, to handle the significant power demands.
- Voltage: Most hot tubs run on 240-volt circuits, requiring a specific type of outlet and wiring.
- Professional Electrician: Due to the complexity and safety concerns, it is HIGHLY recommended to hire a licensed electrician for all electrical work related to your hot tub.
- Safety First: Water and electricity are a dangerous mix. Never attempt electrical work on your hot tub unless you are a qualified professional.
V. Safety Considerations
Absolutely! Let’s dive into the crucial safety points for your DIY hot tub project:
A. Local Codes, Permits, and Inspections
- Regulations: Building codes exist to ensure safety and proper construction. There may be regulations regarding hot tub placement, electrical installation, fencing requirements, and more.
- Ignorance is Not Bliss: Failing to follow codes can result in fines, forced remodels, and endanger yourself and others.
- Contact Local Authorities: Consult your local building department about specific hot tub requirements, permits needed, and any mandatory inspections.
B. Proper Drainage and Overflow
- Water Has to Go Somewhere: Plan for drainage during regular water changes and in the event of overflow due to rain or overfilling.
- Sloped Area: Ideally, position your hot tub on a slight slope to allow gravity to help with drainage.
- Designated Drainage: Direct drainage away from your house foundation and electrical components. Consider a dry well or connection to a storm drain system if available.
- Overflow Drain: Most hot tubs have a built-in overflow drain as a safety backup. Ensure this is plumbed correctly.
C. Covering the Tub When Not in Use
- Safety: A secure hot tub cover is the number one way to prevent accidental drowning, especially with children around.
- Cleanliness: A cover keeps out leaves, debris, and curious animals, meaning less cleaning for you.
- Heat Retention: A quality cover significantly reduces heat loss, lowering energy costs for your hot tub.
- Cover Investment: Choose a cover with good insulation, strong straps, and locking mechanisms for safety and durability.
D. Water Sanitation
- Bacteria Battle: Without proper sanitation, hot tubs can become breeding grounds for harmful bacteria.
- Sanitizer: Chlorine or bromine are the typical sanitizers used. Maintain proper chemical levels according to manufacturer instructions.
- Test Kits: Regularly test pH, sanitizer levels, and calcium hardness to ensure balanced water chemistry.
- Filtration: Your filter is essential to remove small debris. Clean it frequently according to the manufacturer’s instructions.
- Regular Water Changes: Even with good care, you’ll need to drain and refill the hot tub every few months.
VI. Cost Saving Tips
A. Using Reclaimed Materials
- Where to Look: Online marketplaces, salvage yards, construction sites (ask permission first), and even your own shed/garage might yield usable materials.
- Reclaim Potential: Consider these parts for possible reuse:
- Wood (decking, pallets) for framing or exterior if in good condition
- Stock Tanks: Great starting point for the hot tub itself
- Larger containers (clean and food-safe) for equipment housing
- Pavers or bricks for the base
- Things to Avoid: Never reuse plumbing components, electrical equipment, or any materials that have been exposed to harsh chemicals. Safety is paramount.
B. DIY Repairs vs. Hiring Help
- Skill Assessment: Be realistic about your capabilities. Basic plumbing and mechanical repairs might be manageable with research and tutorials.
- Complexity is Key: Major heater malfunctions, significant leaks, or electrical issues are usually best left to qualified technicians.
- Cost vs. Risk: Attempting a repair you’re not equipped for could end up more expensive if you damage components further.
- Resources: Take advantage of hot tub forums and online resources for troubleshooting and step-by-step guides for some common repairs.
C. Energy Efficiency Upgrades
- Cover Upgrade: If your budget allows, a high-quality, well-insulated hot tub cover makes a huge difference in retaining heat.
- Timer: Use a timer on the heater to run during off-peak electricity hours (if your utility offers that).
- Pump Optimization: Some pumps offer variable speeds. Experiment with running it on a lower speed for longer periods to potentially save energy.
- Insulation: If you didn’t insulate during the build, it might be possible to add it retrospectively depending on your hot tub’s design.
- Solar Support: If feasible in your location, supplementing your hot tub’s heating with solar panels can significantly reduce long-term costs.
Recommend energy-saving practices and upgrades that can reduce operational costs over time.
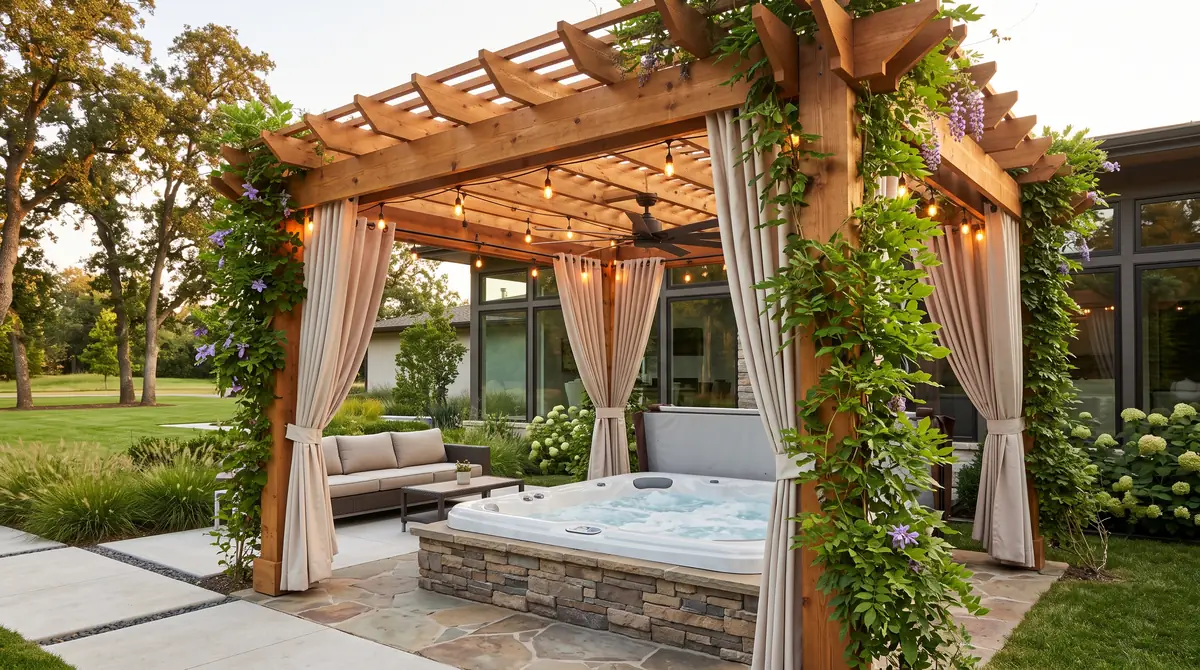
VII. Finishing Touches
A. Tub Surrounds
Inspire with ideas for decking, landscaping, and other surround options to integrate your hot tub seamlessly into its environment.
B. Lighting, Steps, Handrails
Detail the addition of lighting for ambiance and safety, as well as steps and handrails for easy access.
C. Privacy Screens
Offer solutions for adding privacy to your hot tub area through landscaping, fencing, or screens.
VIII. Maintenance and Usage Tips
Daily
- Skim the Surface: Use a net to remove floating debris like leaves, insects, etc.
- Quick Chemical Check: Use test strips to quickly check your sanitizer (chlorine or bromine) and pH levels. Make minor adjustments if needed.
Weekly
- Deep Chemical Check: Thoroughly test levels of sanitizer, pH, alkalinity, and calcium hardness. Adjust based on your test kit’s instructions.
- Filter Cleaning: Remove your cartridge filter and rinse it with clean water from a hose.
- Shock the Water: Add a shock treatment according to the product’s instructions to eliminate contaminants and re-energize the sanitizer.
Monthly:
- Deep Filter Cleaning: Soak your filter in a chemical cleaning solution designed for hot tub filters to remove deep-set deposits. Follow instructions on the cleaning product.
Every 3-4 Months
- Drain and Refill: Completely drain your hot tub, clean the interior surface, and refill with fresh water.
- Inspect the Equipment: Check for any leaks, corrosion, or unusual wear on your pump, heater, and other components.
Conclusion and Final Thoughts
Conclude with a recap of the key points covered and encourage readers to confidently embark on their DIY hot tub project, armed with the knowledge and tips provided in this guide.
Throughout this guide, we’ve included internal links to related articles and resources on Hot Tub Patio’s website, offering deeper dives into specific topics and additional inspiration.
Whether you’re a seasoned DIY enthusiast or a novice ready to tackle a new challenge, building your own hot tub is a fulfilling project that can enhance your home and lifestyle for years.
Explore Our Hot Tub Resources
- Hot Tub Essentials: A comprehensive collection of guides and tools for hot tub owners and enthusiasts.
- Safety First: Key safety tips and guidelines to ensure your hot tub experience is both enjoyable and safe.
- Design Inspirations: Creative ideas and designs to help you visualize and create your dream hot tub setting.
- Calculation Tools: Essential calculators for budgeting and planning your hot tub installation and maintenance.
- Accessories Galore: The best accessories to enhance your hot tub experience, from practical to luxurious.
- Maintenance Guide: Troubleshooting and maintenance advice to keep your hot tub in pristine condition.
- Water Care Simplified: Everything you need to know about keeping your hot tub water clean, clear, and comfortable.