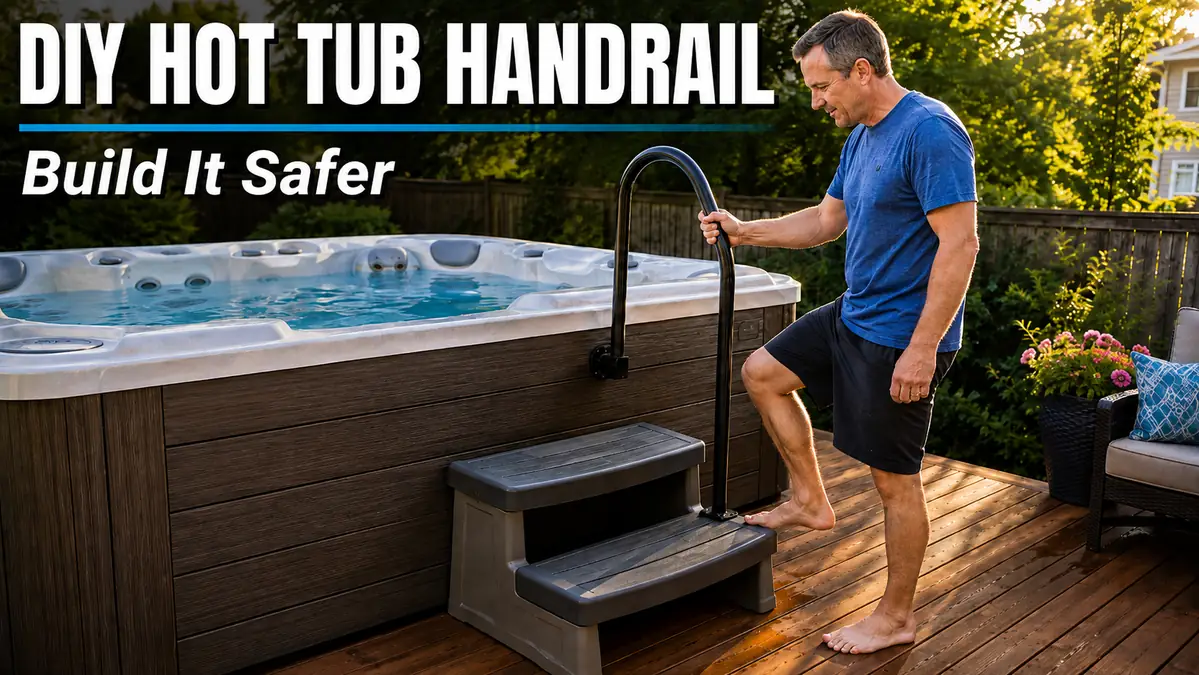
DIY Hot Tub Handrail: Build & Mount It Safely

Getting into a hot tub can become awkward when the spa wall is high, the steps are wet, or there is nothing solid to grab while you shift your weight. A well-positioned DIY hot tub handrail can make that entry much easier.
The rail itself is only part of the project. Where you mount it, what supports it, how the steps are positioned, and whether the rail moves under pressure matter just as much.
This guide helps you choose a mounting method, measure the entry area, select suitable materials, install the rail, and test it before anyone relies on it.
For a larger backyard installation project, plan the rail at the same time as the spa location, electrical access, steps, and service clearance using our hot tub installation planning guide.
Can You Build Your Own Hot Tub Handrail?
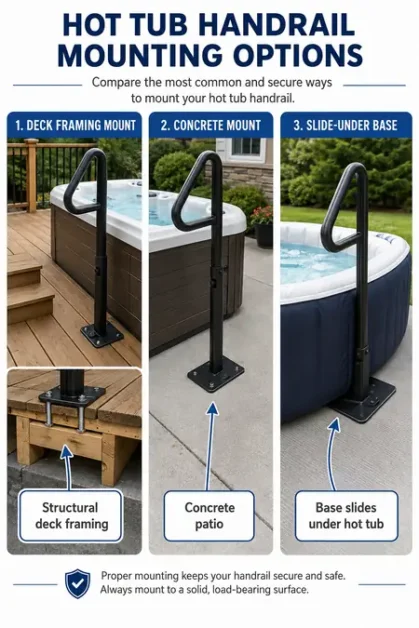
Yes, a DIY hot tub handrail can work when it is attached to a suitable structural surface and positioned where it actually supports entry and exit. A deck-mounted or concrete-mounted rail may be practical, while a slide-under rail can be a better choice when you do not want to modify the spa or surrounding surface.
Do not assume that a removable spa cabinet panel is strong enough to support body weight. Spa construction differs by manufacturer, so check the owner’s manual before drilling or fastening anything to the cabinet.
Use this quick comparison before buying materials:
| Your hot tub setup | Better starting option |
|---|---|
| Spa beside a structurally supported wood deck | Deck-mounted handrail |
| Spa sitting on a concrete patio | Concrete-mounted or slide-under rail |
| Thin or removable spa cabinet panels | Avoid using the cabinet as structural support without approval |
| Inflatable hot tub | Independent steps and rail or compatible no-drill system |
| Rental property | Removable or no-drill rail |
| Spa that may be relocated | Slide-under system |
| User needs significant mobility assistance | Purpose-built support or professional accessibility solution |
The dedicated hot tub handrail buying guide is useful if you decide a ready-made rail makes more sense than building one.

Before You Build, Inspect the Entire Hot Tub Entry Area
A strong handrail cannot compensate for steps that slide across the patio or a landing that becomes dangerously slick when wet.
Walk through the complete entry path before deciding where the rail belongs.
Check the Hot Tub Steps
Push the steps from the front and both sides.
Look for:
- rocking or sliding
- cracked plastic or wood
- loose fasteners
- slick tread surfaces
- narrow steps that make foot placement difficult
- standing water
- uneven contact with the ground
If the steps move while dry, fix that problem before adding a handrail.
Check the Landing Surface
Inspect the patio or deck where the user approaches the spa.
Common problems include:
- loose pavers
- deteriorated wood
- drainage that leaves puddles
- algae or grime on shaded surfaces
- uneven slabs
- winter ice
- poor nighttime visibility
These issues are part of hot tub access safety, not separate cosmetic problems. Our hot tub safety precautions cover other practical checks for safer everyday use.
Check the First Step Inside the Spa
The outside steps may feel comfortable, but the biggest movement often happens when a person steps over the hot tub wall and lowers a foot onto the first molded seat or interior step.
Look at:
- how far the foot must drop
- where the person naturally reaches for support
- whether the interior surface becomes slippery
- whether the user has to turn while lowering into the spa
That movement should influence the rail position.
Identify the Natural Grip Point
Stand beside the empty or covered spa and simulate the entry motion without climbing in.
Notice where your hand naturally reaches as you:
- step onto the exterior stairs
- approach the spa rim
- step over the wall
- lower onto the first interior step
- reverse the movement when exiting
A rail placed only because it looks symmetrical may be in the wrong place for actual use.
Where Should a Hot Tub Handrail Be Mounted?
The best mounting point depends on the structure around your spa. A safety handrail is only as dependable as the surface supporting it.
Mounting a Handrail to a Wood Deck
A deck-mounted handrail should transfer force into suitable structural framing.
A deck board by itself may flex or depend on fasteners that were never intended to carry the forces created when someone pulls sideways on a rail.
Possible structural components include:
- deck joists
- beams
- posts
- properly installed blocking
If your deck was built specifically for the spa, review the structure before choosing the rail location. Our hot tub deck guide explains why spa decks require more planning than an ordinary seating deck.
If adding blocking or modifying the structure is beyond a simple weekend project, compare the work with the situations covered in DIY hot tub deck vs. hiring a contractor.
Mounting a Handrail to Concrete
Concrete can provide an excellent mounting surface when the slab is sound and the selected rail and anchors are designed for the installation.
Inspect the mounting area for:
- major cracks
- crumbling edges
- badly spalled concrete
- previous failed anchor holes
- mounting points too close to the slab edge
Anchor selection depends on the rail, concrete condition, base plate, and installation instructions. Avoid treating every concrete patio as identical.
Mounting a Handrail to the Hot Tub Cabinet
Do not assume the visible cabinet is structural.
Many spa cabinets include removable panels that provide access to pumps, controls, heaters, plumbing, and electrical components. Even when a manufacturer permits accessories to be attached to part of the cabinet, that does not mean every location can safely support a body-weight handrail.
Before drilling:
- identify the spa make and model
- check the current manufacturer’s manual
- locate service panels
- identify anything behind the proposed mounting point
- confirm that the manufacturer permits the installation
When that information is unavailable, choose an independent mounting method instead of guessing.
Using a Slide-Under Hot Tub Rail
A slide-under rail uses a base plate that sits beneath the hot tub rather than relying on cabinet screws.
Benefits include:
- no drilling into the spa cabinet
- removable installation
- useful option for concrete patios
- easier relocation
- many models can swivel away from the cover
Possible drawbacks include:
- movement if the base is not properly positioned
- difficult installation under an already filled spa
- interference with service panels
- limited adjustment on some models
- cover or cover-lifter conflicts
Measure Your Hot Tub Before Building the Rail
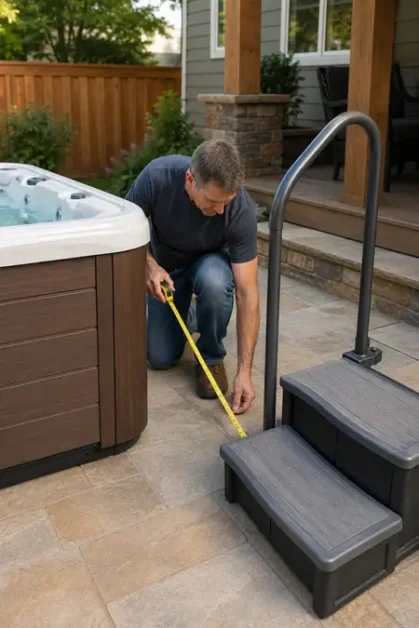
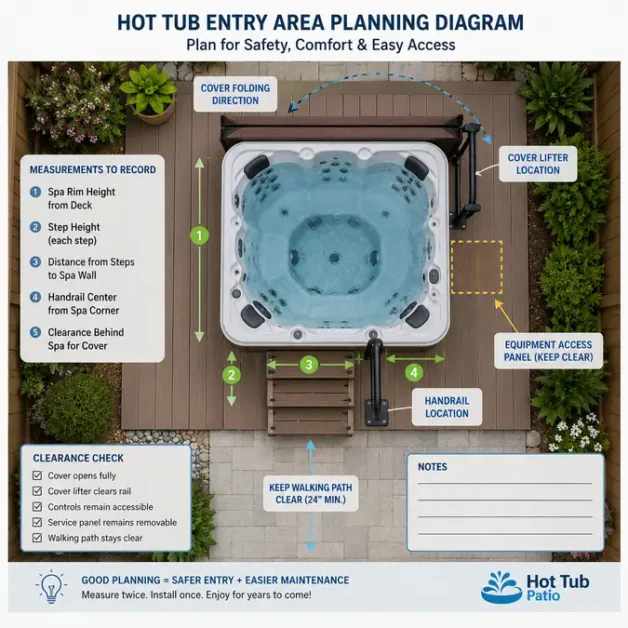
Measure first. A few minutes with a tape measure can prevent a rail from blocking the cover, landing in front of a service panel, or sitting too far from the steps.
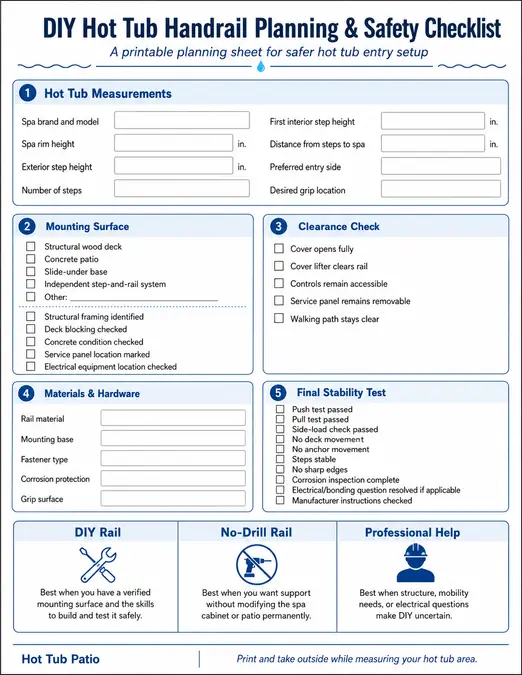
Record:
- spa rim height
- exterior step height
- height of each stair tread
- first interior step or seat height
- distance between the steps and spa wall
- available deck or concrete mounting area
- preferred entry side
- cover folding direction
- cover-lifter movement
- cabinet access panel locations
- approximate comfortable grip position
Check Cover Clearance
Open and close the cover before marking the rail position.
Pay attention to:
- where the cover folds
- where the folded cover rests
- cover-lifter arms
- clearance needed to remove the cover
- space required for a swivel rail
A rail that works perfectly during entry but blocks the cover becomes frustrating very quickly.
Check Service Access
Spa equipment eventually needs maintenance.
Avoid placing permanent rail hardware where it prevents removal of:
- pump access panels
- control-side panels
- heater access
- filter-area covers
- drain access
How High Should a Hot Tub Handrail Be?
The right height depends partly on how the rail relates to the steps and which code requirements apply to your installation.
The 2024 International Swimming Pool and Spa Code states that where its residential spa handrail provisions apply, the top gripping surface is 30 to 38 inches above the ramp or step surface and the handrail material must be corrosion resistant.
Local jurisdictions may adopt, amend, or use different code editions, so verify the requirements that apply to your property before treating those dimensions as universal.
If your spa is reached from a conventional residential stairway, separate residential stair rules may apply. For example, the International Residential Code specifies 34 to 38 inches for covered residential stair handrails.
The practical goal is a rail that can be gripped before the user starts transferring weight, not one positioned only after the difficult step has already happened.
Best Materials for a DIY Hot Tub Handrail
Hot tubs create a wet environment with heat, sanitizer residue, rain, and constant temperature changes. Material choice matters.
| Material | Advantages | Limitations | Better use |
| 316 stainless steel | Strong and corrosion resistant | More expensive and still needs inspection | Permanent wet-area rail |
| Galvanized steel | Strong and widely available | Damaged coating can expose steel | Exterior DIY construction |
| Powder-coated steel | Comfortable finish and good appearance | Chips can expose the metal underneath | Protected outdoor installations |
| Aluminum | Lightweight and corrosion resistant | Connections and wall thickness still matter | Outdoor rail systems |
| Exterior wood | Easy to integrate with a deck | Requires sealing and regular inspection | Structural deck-mounted handrail |
| Ordinary PVC pipe | Cheap and easy to cut | Not a good default for body-weight support | Decorative or nonstructural use |
| Rope | Easy to install | Flexible when support is needed most | Decorative use only |
The 2024 International Swimming Pool and Spa Code specifically calls for corrosion-resistant handrail materials where its spa handrail provisions apply.
Why Rope Is a Poor Primary Safety Rail
Rope moves when a person pulls on it.
That flexibility may be fine for decoration or a visual boundary, but it does not provide the rigid support most people want while stepping over a spa wall.
Why Ordinary PVC Is Not the Best Choice
PVC pipe is useful for many backyard projects, but ordinary plumbing pipe is not designed as a universal safety handrail system.
Sun exposure, temperature changes, fitting strength, pipe diameter, and the forces placed on the joints all affect performance. A rigid metal or properly constructed wood rail is a better starting point for a primary support.
Tools and Materials You May Need
Your list will vary depending on the mounting surface.
Common tools include:
- tape measure
- pencil or marking tool
- level
- drill
- appropriate wood or masonry bits
- socket and wrench set
- screwdriver
- corrosion-resistant mounting hardware
- structural mounting flange or rail base
- deck blocking where required
- concrete anchors when specified for the installation
- exterior-grade protection or sealant where appropriate
Basic protective equipment may include:
- eye protection
- work gloves
- hearing protection when drilling masonry
Do not purchase anchors until you know what the rail will attach to.
Option 1: Build a Deck-Mounted Hot Tub Handrail
A deck-mounted rail works best when you can connect the system to suitable structural framing.
Step 1: Choose the Entry Side
Pick the side where people naturally approach the spa.
Check that the location does not interfere with:
- cover movement
- spa controls
- drink shelves
- service panels
- nearby furniture
- pathways around the tub
Step 2: Locate Structural Framing
Determine what sits beneath the deck boards.
The mounting location may need access to a joist, beam, post, or added blocking. Do not assume screws driven only into a surface deck board will provide enough support.
Step 3: Add Blocking if Needed
Blocking can create a stronger mounting area between structural members when designed and installed appropriately.
If the underside of the deck is inaccessible or the existing structure shows deterioration, stop and evaluate the deck before mounting the rail.
Step 4: Position the Rail
Place the rail where it can be grabbed before the user makes the difficult movement over the spa wall.
Check:
- reach from the first step
- clearance around knuckles
- distance from spa controls
- cover movement
- natural direction of pull
Step 5: Mark and Drill
Use the rail base or mounting plate as a template.
Follow the hardware manufacturer’s requirements for hole size, fastener type, washers, and mounting sequence.
Step 6: Secure and Level the Rail
Tighten the hardware evenly.
A rail that twists while fasteners are tightened may end up under stress before anyone even uses it.
Step 7: Test Before Use
Do not assume the project is finished because the bolts feel tight.
Use the stability test later in this guide before anyone depends on the rail.
Option 2: Install a Handrail on a Concrete Patio
A concrete-mounted handrail can create a clean, permanent setup without modifying the spa.
Step 1: Inspect the Concrete
Choose sound concrete away from obvious cracking, deterioration, and weak slab edges.
If the patio is badly damaged, repair or evaluate the mounting area before drilling.
Step 2: Test the Rail Position
Set the rail temporarily in place and simulate entry.
Confirm that:
- the user can reach it naturally
- the steps remain centered
- the cover clears it
- the spa cabinet can still be opened
Step 3: Mark the Base
Mark each anchor location carefully.
Check the alignment twice before drilling because the mounting holes will be permanent.
Step 4: Drill the Holes
Use the correct masonry bit and drilling method for the anchor system you selected.
Anchor size, depth, spacing, and edge distance should follow the hardware manufacturer’s instructions rather than a universal DIY measurement.
Step 5: Install the Rail
Secure the base evenly and check the rail with a level.
Stop if the mounting plate rocks or an anchor fails to tighten correctly.
Step 6: Inspect the Finished Base
Make sure:
- fasteners are fully seated
- the base is flat
- no new cracks formed around the holes
- water is not collecting around damaged concrete
When a No-Drill Hot Tub Handrail Is the Better Choice
Building a permanent rail is not always the best solution.
A slide-under or removable handrail may make more sense when:
- you do not want to drill the spa cabinet
- the spa sits on a patio with no convenient structure
- the property is rented
- the hot tub may be relocated
- service access would be blocked by a permanent rail
- the deck structure needs further evaluation
- you want an adjustable or swiveling rail
A commercially designed system may cost more than a simple DIY build, but avoiding an unsuitable mounting point can be worth the difference.
For a closer look at styles and features, compare the different hot tub handrail options.
How to Test a Hot Tub Handrail Before Anyone Uses It
A finished rail should be tested before wet feet, body weight, and an awkward step are added to the situation.
Use this five-part check.
1. Push Test
Apply controlled pressure away from the spa.
Watch:
- the rail
- mounting base
- deck surface
- concrete
- surrounding fasteners
Movement below the rail matters just as much as movement in the rail.
2. Pull Test
Pull the rail toward the normal entry direction.
A rail that looks solid when pushed downward may shift when pulled sideways.
3. Side-to-Side Test
Apply gentle sideways pressure.
Check for:
- loose connections
- flexing deck boards
- rocking base plates
- movement in swivel mechanisms
4. Inspect Every Fastener
Look for:
- bolts backing out
- spinning anchors
- split wood
- cracked concrete
- compressed or damaged deck boards
- rust around mounting points
5. Simulate the Entry Motion
With the area dry and the spa covered or otherwise safely positioned, carefully walk through the normal entry movement without committing full body weight to an unproven rail.
If anything shifts, stop and find the cause.
Why Is My Hot Tub Handrail Wobbly?
A wobbly handrail does not always mean the rail itself is defective.
Several parts of the installation can move.
The Slide-Under Base Is Moving
A slide-under rail may shift when:
- the base is not fully positioned
- the spa does not apply enough pressure to the intended area
- the adjustment hardware is loose
- the surface underneath is uneven
Check the rail manufacturer’s installation instructions before modifying the system.
Deck Boards Are Flexing
Watch the deck instead of staring only at the rail.
If the board moves when the rail moves, tightening the handrail bolts may not solve the actual problem.
Fasteners Are Loosening
Outdoor hardware is exposed to moisture, temperature changes, and repeated loading.
Inspect it periodically instead of waiting until the rail feels loose.
Concrete Anchors Are Moving
Stop using the rail if an anchor visibly shifts in the concrete.
Repeated tightening can make a damaged anchor hole worse.
The Swivel Joint Has Excessive Play
Swiveling rails have moving parts, so they may not feel identical to a fully fixed rail. Excessive movement, a loose locking mechanism, or a rail that will not stay in its intended position needs attention before use.
The Rail Is Positioned Poorly
A rail installed too far from the steps can cause the user to pull sideways instead of using the support naturally.
Sometimes repositioning the entry setup is a better fix than trying to make the existing rail stronger.
Pair the Handrail With Safer Hot Tub Steps
A rail and steps should work as one entry system.
Look for steps that provide:
- wide enough treads for secure foot placement
- textured or slip-resistant surfaces
- stable contact with the patio or deck
- drainage so water does not collect
- appropriate support for the intended users
- good visibility at night
Avoid using:
- loose stools
- stacked blocks
- lightweight household steps
- slick plastic platforms not designed for wet outdoor use
If the surrounding deck is being redesigned, plan the entry area with the same care as the spa itself rather than adding steps after everything else is finished.
DIY Hot Tub Handrails for Seniors and Limited Mobility
For an older adult or someone with reduced balance, the safest setup may require more than one rail.
Consider:
- lower exterior step heights
- wider treads
- support on both sides
- a rail that can be reached before stepping up
- lighting around the landing
- a clear path without hoses or furniture
- slip-resistant walking surfaces
A person who relies heavily on the handrail to transfer body weight may need a purpose-built accessibility system instead of a simple homemade rail.
In some situations, better stairs, a transfer aid, or a spa lift can be more appropriate than making the handrail taller or stronger.
Can You Add a Handrail to an Inflatable Hot Tub?
Yes, but an independent support system is usually a better approach than attaching a load-bearing rail to the flexible spa wall.
Do not drill, screw, or puncture an inflatable wall to install an ordinary handrail.
Better options may include:
- stable spa steps with an integrated rail
- independent freestanding support
- a compatible slide-under rail
- manufacturer-approved accessories
Inflatable spa walls are designed to hold air and water while remaining flexible. Bestway, for example, describes its inflatable spa walls as multilayer flexible construction designed to maintain the spa’s shape.
For broader setup risks, see our inflatable hot tub safety guide.
Hot Tub Handrails, Metal, and Electrical Safety
Permanent conductive metal installed near a spa deserves an electrical safety check before construction.
Electrical bonding requirements vary based on the spa type, location, surrounding conductive surfaces, local code adoption, and installation details. Current code provisions include specific bonding rules and exceptions for certain listed self-contained spas installed above ground.
That means the correct answer is not always “bond every rail” or “no bonding is needed.”
Before installing permanent metalwork:
- check the spa installation manual
- identify the electrical code adopted locally
- ask the local authority having jurisdiction when requirements are unclear
- use a licensed electrician for bonding or electrical modifications
Our guide to common hot tub wiring mistakes explains why electrical work around water is not a good place for guesswork.
Prevent Rust and Corrosion on a Hot Tub Handrail
Even corrosion-resistant materials need inspection around a hot tub.
Moisture, sanitizer residue, outdoor exposure, chipped coatings, and winter conditions can all affect hardware over time.
Check the Rail Regularly
Look for:
- orange or brown staining
- bubbling paint
- chipped powder coating
- rust around bolt heads
- corrosion beneath mounting plates
- loose connections
Rinse Residue
If sanitizer-rich water regularly splashes onto the rail, rinsing the surface with clean water can reduce residue buildup.
Repair Damaged Coatings
Small chips can expose the metal underneath.
Follow the rail or coating manufacturer’s repair instructions rather than painting over active corrosion.
Replace Badly Corroded Hardware
A bolt that has lost significant material should not be trusted simply because it still feels tight.
Inspect the system at least seasonally and any time the rail starts to move or look different.
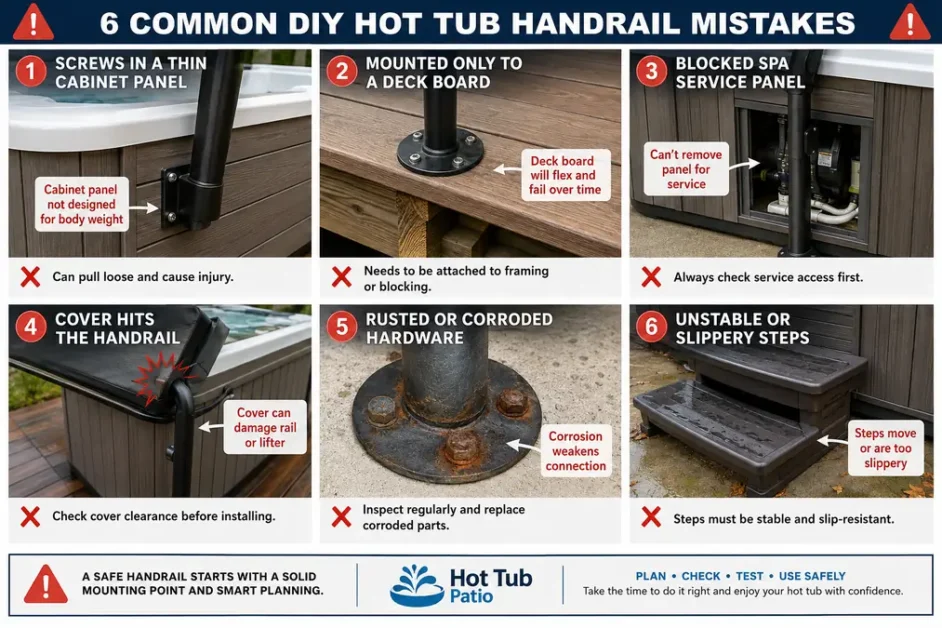
Common DIY Hot Tub Handrail Mistakes
Avoid these problems before they become difficult to correct:
- Screwing into a decorative cabinet panel without confirming structural support
- Mounting a rail only to unsupported deck boards
- Drilling before checking cover clearance
- Blocking a removable service panel
- Choosing rail position based only on appearance
- Using rope as the primary body-weight support
- Using ordinary PVC without a structural design
- Ignoring corrosion-resistant hardware
- Installing close to damaged concrete edges
- Ignoring slippery or unstable steps
- Assuming tighter bolts will fix a moving structure
- Installing permanent metalwork without checking applicable electrical requirements
DIY vs. Store-Bought Hot Tub Handrail
Both approaches can work. The better choice depends on your mounting surface and how much structural work the project requires.
| DIY handrail | Store-bought handrail |
| Can fit a custom deck layout | Faster installation |
| Material and dimensions can be customized | Adjustable models are widely available |
| Works well with structural deck construction | Slide-under options avoid spa drilling |
| Requires mounting and structural planning | Hardware is designed as part of a system |
| You are responsible for selecting compatible components | Usually simpler for portable spas |
| Best when suitable structure already exists | Useful when permanent modifications are undesirable |
DIY makes the most sense when you already have a suitable structural mounting point and understand how the rail will be supported.
A ready-made rail often makes more sense when the spa sits by itself on a patio and you mainly need a stable handhold.
When You Should Not DIY the Handrail
Stop and get professional help when:
- the deck feels soft or visibly moves
- structural framing cannot be identified
- concrete is cracked or badly deteriorated
- the spa is recessed into a complicated deck
- permanent metalwork creates unanswered bonding questions
- installing the rail requires modifying spa structure
- electrical equipment sits behind the proposed mounting area
- the user depends heavily on the rail for mobility or transfers
- local building requirements are unclear
The goal is not to complete the DIY project at any cost. It is to create an entry setup people can rely on.
DIY Hot Tub Handrail Safety Checklist
Use this checklist before the first soak:
- Exterior steps sit level
- Steps do not slide or rock
- Treads provide secure footing
- Landing drains properly
- Mounting surface is structurally suitable
- Deck framing or blocking has been checked
- Concrete is sound
- Spa cabinet is not being treated as structural support without manufacturer approval
- Rail can be reached before the difficult entry movement
- Cover opens and closes normally
- Cover lifter clears the rail
- Service panels remain accessible
- Hardware is suitable for outdoor wet conditions
- Rail does not wobble
- Mounting surface does not move
- Fasteners show no corrosion or damage
- Applicable electrical or bonding requirements have been checked
- Manufacturer instructions have been reviewed
Downloadable Resource
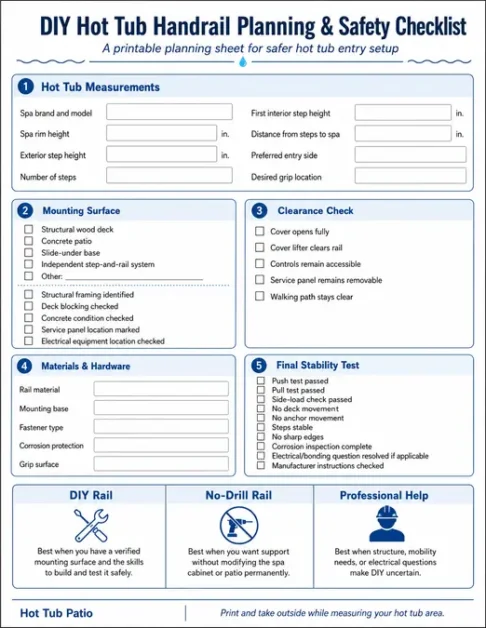
More printable spa-owner tools can be grouped with the site’s free hot tub resources.
Frequently Asked Questions
Can I screw a handrail directly into my hot tub?
Do not assume the outer cabinet is strong enough for a body-weight handrail. Check your spa manufacturer’s instructions and approved mounting locations before drilling into the cabinet.
What is the best material for a DIY hot tub handrail?
Corrosion-resistant stainless steel, protected steel, aluminum, or properly constructed exterior wood are better starting materials than flexible rope or ordinary PVC. The correct choice depends on how and where the rail will be mounted.
How do I stop my hot tub handrail from wobbling?
Check the mounting base, fasteners, deck structure, concrete anchors, and any swivel joints. If the surface supporting the rail moves, tightening the rail alone will not solve the problem.
Can I install a hot tub handrail without drilling?
Yes. Slide-under rails and some independent step-and-rail systems provide support without drilling into the spa cabinet or patio.
Can I attach a handrail to hot tub steps?
Only when the step system is specifically designed to support the rail and the forces a user will place on it. Do not attach a load-bearing rail to lightweight steps unless the manufacturer approves that setup.
Which side of the hot tub should the handrail go on?
Place it on the side where the user naturally reaches while climbing the exterior steps and stepping over the spa wall. Check cover movement and service access before making the installation permanent.
Can I make a PVC hot tub handrail?
PVC is easy to work with, but ordinary plumbing pipe is not the best default material for a primary body-weight support. A structural metal or properly built wood system is usually more suitable.
Do hot tub handrails rust?
They can. Moisture, sanitizer residue, damaged coatings, and outdoor exposure can corrode rails and fasteners, so inspect them regularly.
Do I need a handrail for my hot tub?
Not every hot tub needs one, but a handrail can make access easier when the spa wall is high, exterior steps are required, or a user wants more support while entering and exiting.
What type of handrail works with an inflatable hot tub?
Independent steps with an integrated rail or a compatible no-drill system are usually more appropriate than fastening a handrail to the inflatable wall.
A Safer Hot Tub Entry Starts With the Mounting Point
A DIY hot tub handrail can make getting in and out of your spa much easier, but the pipe or rail you can see is only half of the project. The mounting structure, step stability, cover clearance, grip position, hardware, and regular inspections determine how useful the finished setup will be.
Measure the entry path before buying materials, choose a mounting point you can verify, and test the completed rail from several directions. If the structure, electrical requirements, or user’s mobility needs are beyond a straightforward DIY installation, choose a purpose-built system or bring in the right professional.